Posture detection system with OpenCV and MediaPipe
2nd November, 2024Understanding the concept
Our goal is to use computer vision to detect a person’s posture and determine whether they are sitting upright or slouching. We achieve this by
- Capturing frames from the webcam.
- Using MediaPipe's Pose Detection model to identify key body landmarks.
- Calculating the angle between the shoulders and the nose to determine the posture.
- Alerting the user with a sound if poor posture is detected consistently.
Before we dive in to the code, we need to be mindful about the security and privacy aspects, since we are using webcam to detect the posture, other applications who have access to webcam can make use of it, we need to check the necessary permissions of the webcam to make sure we are safe.
Prerequisites
Before we dive into the code, we need to make sure below packages are installed. Using venv is highly recommended
- Python (version 3.6+)
- OpenCV (pip install opencv-python)
- MediaPipe (pip install mediapipe)
- Numpy (pip install numpy)
Step-by-Step implementation
Let's break down the implementation into manageable parts.
1. Importing libraries
import cv2
import mediapipe as mp
import numpy as np
Let's begin by importing the necessary libraries
- OpenCV for capturing video and processing frames.
- MediaPipe for pose detection.
- Numpy for mathematical operations.
2. Initialize MediaPipe pose
mp_pose = mp.solutions.pose
pose = mp_pose.Pose(static_image_mode=False, model_complexity=0, enable_segmentation=False, min_detection_confidence=0.5)
mp_drawing = mp.solutions.drawing_utils
Here, we set up the MediaPipe Pose object with the desired configurations. Keeping in mind the memory consumption the configurations used here does not bring out complete features of MediaPipe, even with this lesser configuration the results were accurate every time.
- static_image_mode=False: For video input.
- model_complexity=0: A simpler model to save computation resources.
- enable_segmentation=False: Disables segmentation to reduce processing time.
- min_detection_confidence=0.5: Only landmarks detected with at least 50% confidence are used.
3. Define angle calculation
def calculate_angle(a, b, c):
    a = np.array(a)
    b = np.array(b)
    c = np.array(c)
    radians = np.arctan2(c[1] - b[1], c[0] - b[0]) - np.arctan2(a[1] - b[1], a[0] - b[0])
    angle = np.abs(radians * 180.0 / np.pi)
    if angle > 180.0:
        angle = 360 - angle
    return angle
calculate_angle(a,b,c) function computes the angle between three points in 2D space to check the posture. We will explore more about the 3 parameters a,b and c later in the post. The first three lines of the function converts the points to NumPy arrays for easier mathematical calculations, in the next two lines we use trigonometry (arctan2) to calculate the angle in radians and converts it to degrees and finally we adjust the angle to always be between 0 and 180 degrees.
The angle should be between 0 and 180 degrees because it represents the measurement between two vectors formed by three points (in our case, the coordinates of body landmarks like shoulders and nose). When calculating angles using vectors, the output can range from 0 to 360 degrees. However, in the context of posture detection, angle greater than 180 degrees don't make physical sense for evaluating the alignment of the body. A posture angle will always be in the range of 0 to 180 degrees since the human body cannot naturally fold backward beyond 180 degrees in this scenario.
Also limiting the angle to a 0-180 degree range simplifies the analysis and interpretation of the posture. If the angle exceeds 180 degrees, we take the complement (360 - angle) to ensure we're measuring the smaller angle between the two vectors, which is more relevant for posture assessment.
Hence, by keeping the angle between 0 and 180 degrees, we can accurately determine whether someone is slouching or sitting Straight.
4. Initialize webcam and other necessary variables
lower_angle_limit = 38
upper_angle_limit = 44

capture = cv2.VideoCapture(0)
lower_angle_limit and upper_angle_limit are the angle between the 3 points, two shoulders points and nose. We need to change these values based on our conditions, like placement of webcam, sitting position etc. cv2.VideoCapture(0) is used to capture the video throw the webcam
5. While loop for processing the video
while capture.isOpened():
    ret, frame = capture.read()
    if not ret:
        break

    image = cv2.cvtColor(frame, cv2.COLOR_BGR2RGB)
    results = pose.process(image)
    if results.pose_landmarks:
        mp_drawing.draw_landmarks(image, results.pose_landmarks, mp_pose.POSE_CONNECTIONS)

        landmarks = results.pose_landmarks.landmark

        shoulder_left = [landmarks[mp_pose.PoseLandmark.LEFT_SHOULDER].x,
                         landmarks[mp_pose.PoseLandmark.LEFT_SHOULDER].y]
        shoulder_right = [landmarks[mp_pose.PoseLandmark.RIGHT_SHOULDER].x,
                          landmarks[mp_pose.PoseLandmark.RIGHT_SHOULDER].y]
        nose = [landmarks[mp_pose.PoseLandmark.NOSE].x, landmarks[mp_pose.PoseLandmark.NOSE].y]

        angle = calculate_angle(shoulder_left, nose, shoulder_right)

        if angle > upper_angle_limit or angle < lower_angle_limit:
          cv2.putText(image, "Sit Straight!", (50, 50), cv2.FONT_HERSHEY_SIMPLEX, 1, (0, 0, 255), 2)

    cv2.imshow("Posture Detection", image)
    if cv2.waitKey(10) & 0xFF == ord('q'):
        break
From the capture we check if the webcam is opened, capture.isOpened() returns True if the webcam is opened and False otherwise. ret and frame are output of capture.read(), ret is a boolean which will be True if the OpenCV library is able to capture the next frame, False otherwise and frame is the next frame that is captured, it is the NumPy array if the frame is successfully read or None if ret is False. Hence we are exiting if ret is False.
cv2.cvtColor(frame, cv2.COLOR_BGR2RGB) is used to covert the frame to RGB format, as media pipe requires the image to be in RGB, by default OpenCV captures the image in BGR format. It is then processed pose.process(image) and if the results of the processing has pose_landmarks we proceed with our calculation.
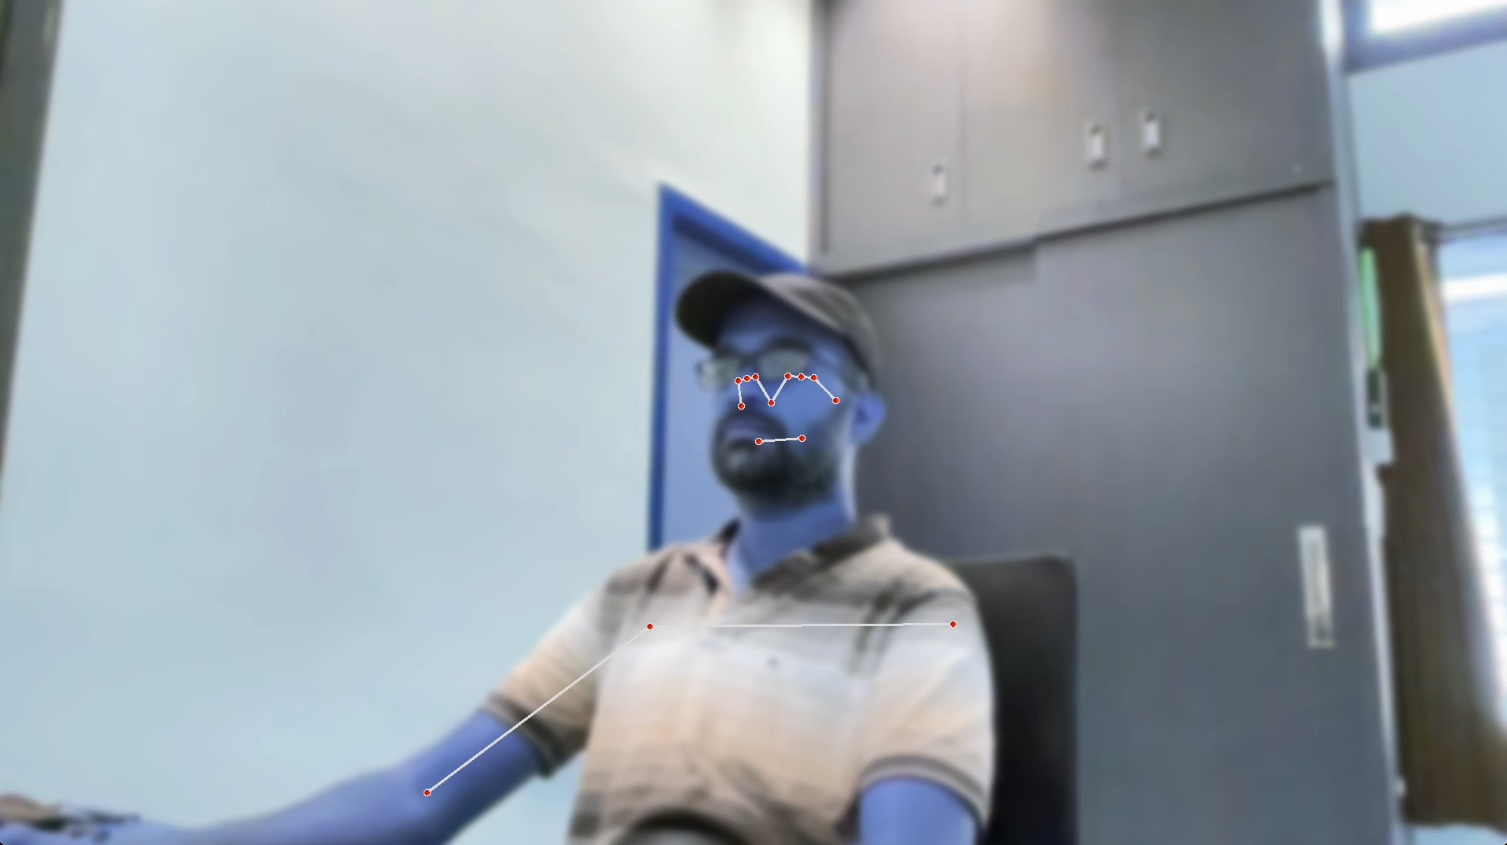
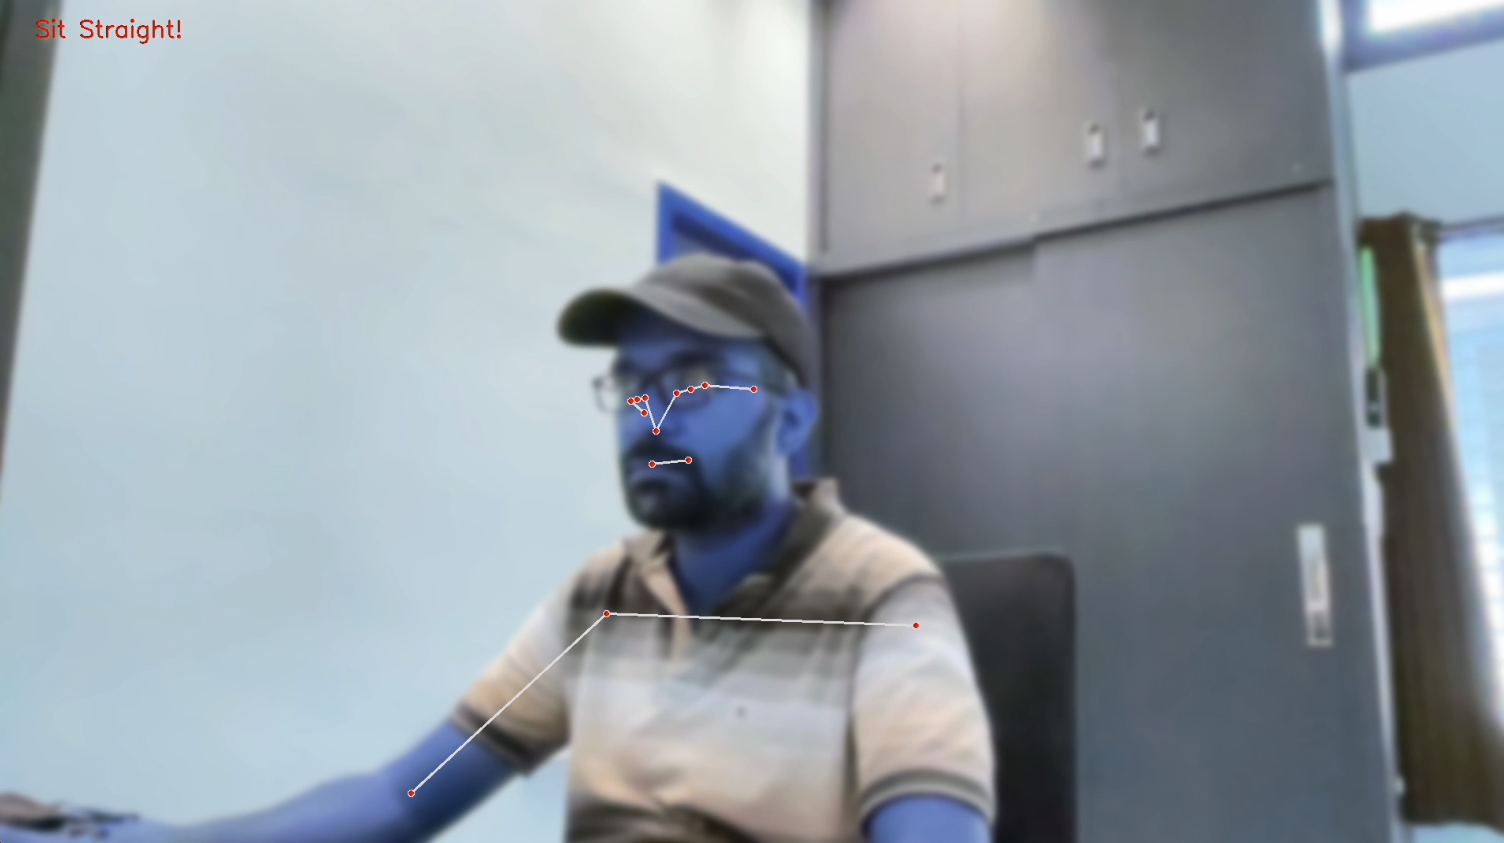
mp_drawing.draw_landmarks(image, results.pose_landmarks, mp_pose.POSE_CONNECTIONS) is function provided by MediaPipe's drawing utility, it takes an image and draws landmarks and connections (like a skeleton) to illustrate key points on the body and how they are connected. image is the image/frame on which we want to draw the landmarks and pose connections. results.pose_landmarks contains the detected pose landmarks, which are key points on the human body such as the nose, shoulders, elbows, hips, knees, etc (red dots). It will have the coordinates (x, y, z) of each key point, which are used to draw the landmarks. mp_pose.POSE_CONNECTIONS is a predefined set of connections that specify how the landmarks are connected to form a human skeleton, it defines which points are connected to represent arms, legs, the torso, etc (white lines).

From the landmarks we get shoulder_left, shoulder_right and nose which are the python lists containing the x and y coordinates of the respective body landmarks. These are provided to the calculate_angle(shoulder_left, nose, shoulder_right) function to get the angle, it measures the angle at the nose between the lines connecting shoulder_left to nose and nose to shoulder_right. This configuration makes sense because we are interested in how the person's posture is positioned relative to the nose, as it gives a natural orientation for posture analysis.
In the next if condition based on the angle we show a text on the image "Sit Straight!". We can change the upper_angle_limit and lower_angle_limit values based on our conditions, like placement of webcam, sitting position etc. We can print the angle to the console and move the webcam or ourselves to the best posture position and based on the angle value we can update the upper and lower limits

In the if cv2.waitKey(10) & 0xFF == ord('q'): condition we are checking if user presses q key, if the key is pressed we quit the program
Enhancements
With the above logic we are able to identify the posture and show a text on the video "Sit Straight!", but in a real world use case this is not user friendly, a user won't be looking at the video all the time to check the "Sit Straight!" text and correct the posture and rendering the video all the time will consume memory, we will work on memory consumption later in the post.
1. Using sound instead of the text
In real world use case it makes to have a specific sound played when we move out of posture, this can be easily achieved with use the os module, we import the os module and using afplay command line utility we play the sound. afplay works on mac, we can use respective utility on different systems to achieve the same.
import os
...
...
while capture.isOpened():
  ...
  ...
  if results.pose_landmarks:
    ...
    ...
    if angle > upper_angle_limit or angle < lower_angle_limit:
      os.system('afplay ./sound.wav')
    ...
    ...
We have to replace cv2.putText(image, "Sit Straight!", (50, 50), cv2.FONT_HERSHEY_SIMPLEX, 1, (0, 0, 255), 2) with os.system('afplay ./posture-alert.wav'), this is a blocking call, that means until the full sound is played the loop won't continue, recommendation is use to a sound which is less than 1 sec in duration.
2. Exiting the program when the screen is locked
With the above code the program will keep on running even when we lock the screen, which is not needed, we can detect the screen lock and end the program. On mac we have Quartz module which will help in that.
import Quartz
...
...
def is_screen_locked():
    d = Quartz.CGSessionCopyCurrentDictionary()
    if 'CGSSessionScreenIsLocked' in d.keys():
        return True
    return False
...
...
while capture.isOpened():
    if is_screen_locked():
        print("Screen is locked. Exiting...")
        break
    ...
    ...
After the while we will check if the screen is locked and break out of the program. To start the program again multiple ways can be used, based on our comfort that can be achieved, leaving that out now as that will complicate this post.
3. Reducing the memory usage
-
Closing the video playback. Playing the video along in the foreground won't help in anyway once we figure out the upper and lower angles, so it makes sense to not the play the video and reduce some memory consumption. We can remove cv2.imshow("Posture Detection", image) to achieve this.
-
Reducing the resolution of the video captured. After we get the capture = cv2.VideoCapture(0) we can use the below code to set the resolution. The below code will capture the video in 240p resolution. If we decide to go with this we also need to alter the upper and lower limit angle.
...
...
capture = cv2.VideoCapture(0)
capture.set(cv2.CAP_PROP_FRAME_HEIGHT, 240)
capture.set(cv2.CAP_PROP_FRAME_WIDTH, 426)
...
...
- Run the processing on every 30th loop. Currently we run the processing on every loop which can be memory intensive, we can reduce this by running the processing on every 30th loop or 60th loop based on our use case.
...
...
loop_counter = 0
loop_skip_interval = 30
...
...
while capture.isOpened():
  ...
  ...
  loop_counter += 1
  if loop_counter % loop_skip_interval != 0:
      continue
  ...
  ...